Coffee in El Salvador
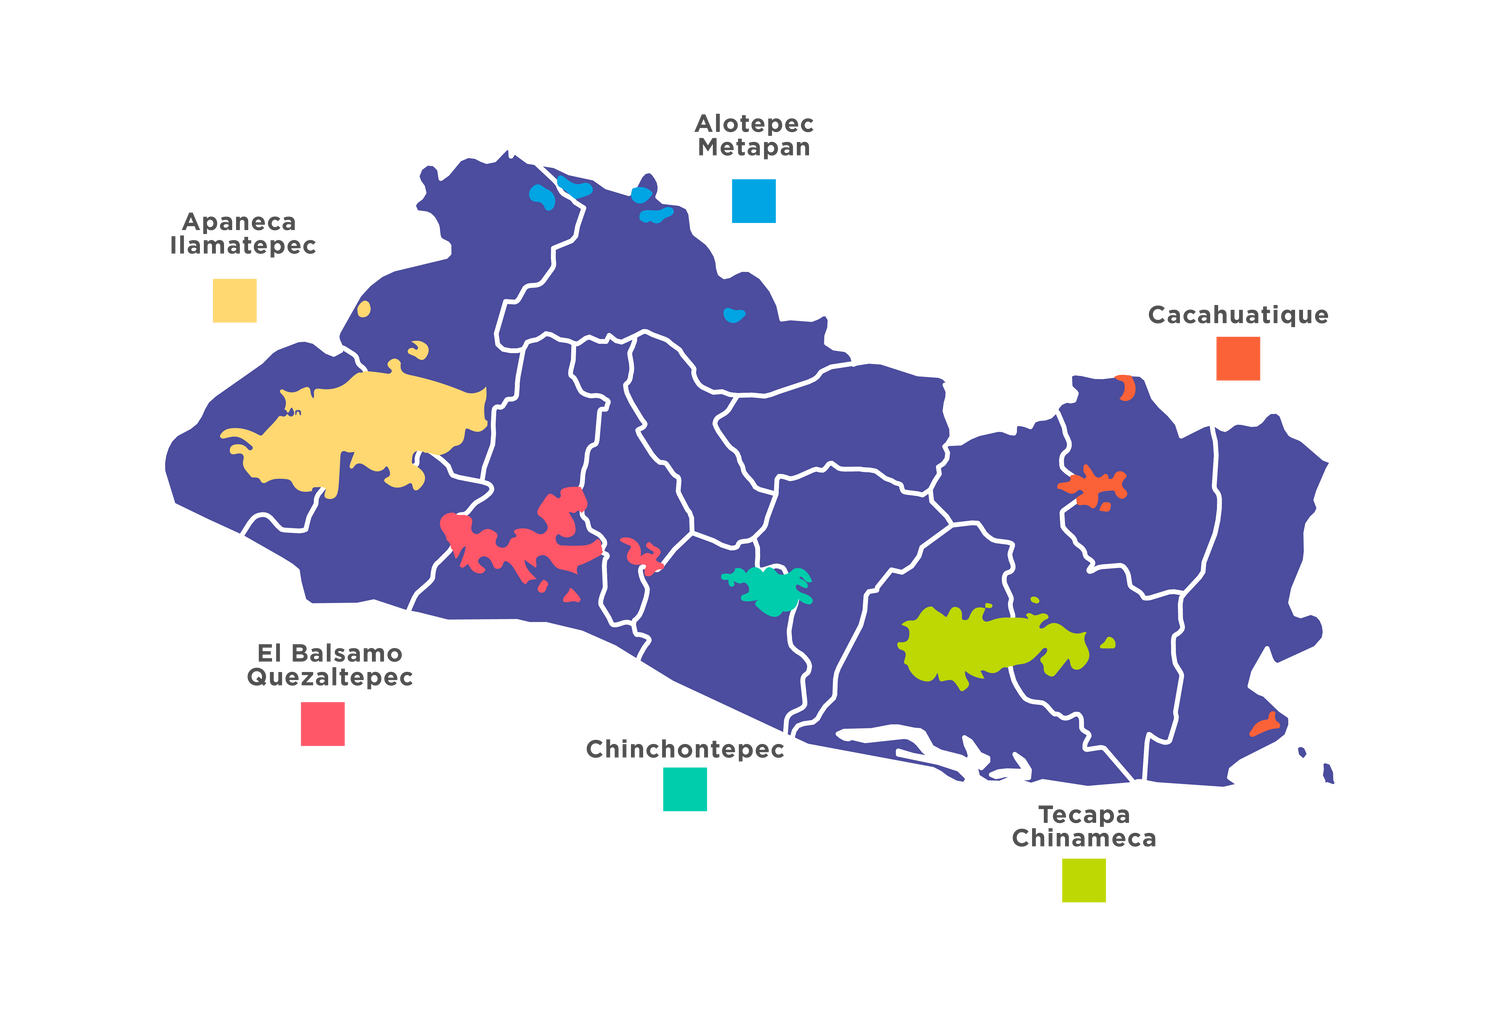
El Salvador is the smallest country in Central America, and 90% of its area is volcanic matter, with 170 volcanoes, 23 of which are active. Coffee plants grown at high altitudes in these nutrient-rich volcanic soils make El Salvador's specialty coffee unique—a bean with balanced acidity and a bright taste.
The country boasts seven prominent coffee-growing regions: Apaneca-Ilamatepec, El Balsamo-Quezaltepec, Chichontepec, Alotepec-Metapan, Cacahuatique, Tecapa-Chinameca, and El Bálsamo. These regions benefit from rich volcanic soil, high altitudes, and a favorable climate, creating perfect conditions for producing high-quality coffee. Each region offers unique flavor profiles, showcasing the diversity and excellence of Salvadoran coffee.
Coffee Varieties
A coffee variety is a type of coffee plant that has distinct characteristics. Just like there are different types of apples, such as Granny Smith and Gala, there are different types of coffee plants, each with its own unique flavor, size, and growing conditions. These differences are usually due to genetics and the environment where the coffee is grown.
El Salvador coffee producers are 100% dedicated to growing Arabica coffees; a type of coffee known for its smooth, mild flavor and higher quality compared to other types.
Arabica varieties are plentiful in The Land of Volcanoes—here are a few of our favorites:
- Bourbon: An arabica variety of utmost importance known for higher quality potential at higher altitudes.
- Pacamaras: Primarily grown in El Salvador, this variety produces a large bean size & an exceptional cup.
- Pacas: Discovered in El Salvador, a natural mutation of the Bourbon variety accounting for 25 % of the country's coffee production.
Cipota Coffee Recipes
Espresso
Espresso
Crafting the perfect espresso involves several key factors: grind size, water, temperature, and puck preparation. As our understanding of coffee grows, so does this list. Here’s a recipe and some tips to help you achieve your ideal espresso.
The type of coffee you use greatly affects the grind size, so don’t be afraid to experiment. A recommended ratio is between 1:1.5 to 1:2.5. This means for every 1 part coffee, use 1.5 to 2.5 parts water.
As a standard recipe, I like to use 20 grams of coffee with a 1:2 ratio. With 20 grams of coffee, this results in an extraction of 40 grams of espresso. Have fun and enjoy the process!
Recipe 1:2 ratio(coffee: water)
- 20 grams of coffee
- 40 grams water
Tip: an espresso scale will come in handy!
Pour Over
Pour Over
Ah, the pour-over method of brewing coffee – possibly the most relaxing of them all. With many options to choose from, like Chemex and Kalita, I will be sharing my go-to: the Hario V60. You can be flexible with the ratio depending on your coffee preference. Some people prefer a 1:15 ratio, while others like 1:18. I personally enjoy a 1:16 ratio, but feel free to experiment and find what works best for you.
Grind size is still important here play around with a medium-fine grind. Your ideal result may differ depending on the coffee you are brewing!
Hario V60 Recipe
- 20 grams of coffee
- 320 grams of water (heated to 200°F/93°C)
Equipment
- Hario V60 dripper
- Paper filter
- Gooseneck kettle
- Scale with timer
Place the Hario V60 dripper on your cup or carafe. Insert a paper filter into the dripper and rinse it with hot water to remove any papery taste and preheat the dripper. Discard the rinse water.
Weigh out 20 grams of coffee beans and grind them to a medium-fine consistency.
Place ground coffee into the filter(some like to shake here to level the grounds,your choice)
Here is where the fun starts:
Bloom: Start your timer and pour 32 grams of hot water ensuring water has touched all the coffee. Allow the coffee to bloom for 30 seconds. This step releases CO2 and allows the coffee to degas.
First Pulse: After the bloom, slowly pour water in a circular motion, starting from the center and moving outward, until you reach 128 grams. Pour gently.
Second Pulse: Continue pouring gently in a circular motion from the center outward until you reach total of 224 grams of water.
Final Pulse: Continue pouring using the same motion until you reach total of 320 grams of water. Allow the coffee to drip through completely.
Remove the dripper, give your coffee a gentle swirl, and enjoy!
Tips: For best results use heated water at 200°F. Pour gently and slowly in circular motion from the center outward.
Auto-Drip
Auto-Drip
Now, I’m sure if you’re making a full batch of auto drip at home, it’s either to sip on throughout the morning or to share with the entire family. I love auto drip coffee – it’s so simple yet so fulfilling. Here’s a recipe for 4 cups of auto drip using a 1:15 ratio. Remember, this is just a standard recipe. You can play around with your ratio. Always experiment with different coffees and have fun with it!
Auto Drip Recipe:
- 53 grams of coffee (medium grind)
- 800 grams (or milliliters) of water
Lets Begin!
Prepare your Machine: Fill the water reservoir with 800 grams (or milliliters/~27 fl oz) of water.
Measure and Grind: Weigh 53 grams of coffee beans and grind. Use a medium grind size.
Add Coffee: Depending on your machine place a filter in the basket then your ground coffee.
Brew: Begin the brewing process. Let the coffee brew completely, which should take around 4-6 minutes depending on your machine.
Tips: I like to use a kettle to wet the filter in the basket before brewing, if the machine allows.
Cold Brew
Cold Brew
Cold brew – the people's favorite. Although it wasn’t initially one of my preferred ways to enjoy coffee, it’s grown on me as a fun and versatile brewing method. Here’s a french press cold brew recipe that you can easily make at home using a 32 oz standard french press and a 1:8 ratio.
French Press Cold Brew recipe:
- 100 grams of coarsely ground coffee
- 800 grams (or milliliters) of cold water
Instructions:
Combine Coffee and Water: Grind 100 grams of coffee using a coarse grind and add to your French press. Pour 800 grams of cold water over the coffee grounds.
Stir and Steep: Stir gently to ensure all the grounds have made contact with the water. Place the lid on the French press without pressing the plunger down. Let it steep in the refrigerator for 12 to 24 hours, depending on your desired strength.
Press and Strain: After steeping, slowly press the plunger down to separate the grounds from the liquid.
Tips: After steeping pour entire brew into another container to separate from coffee grounds. If you steeped longer than desired you can always add more water to the final brew for your desired taste.